Quantcast
Channel: Natural Chicken Keeping
Viewing all 182 articles
Browse latest View live

Make Your NCK Calendar Photo Selections!


Make Your NCK Calendar Photo Selections II

Make Your NCK Calendar Photo Selections - Part III

Make Your NCK Calendar Photo Selections - Part IV

Make Your NCK Calendar Photo Selections - Part V

Make Your NCK Calendar Photo Selections - Part VI

Photo Finalists for the NCK 2014 Calendar

$
0
0
OK - we have some tough choices to make, folks! We've narrowed down the photos to your favorites, and now we need to narrow it down even more. 

We need you to vote for your 3 favorites for each season.

You can click on the photos if you'd like to see a larger image.

Keep in mind:
  • We need variety! While hens with their chicks are adorable, we don't want to feature them every month. Perhaps one hen with chicks picture per season (Possibly 2 for Spring).
  • Look for photos you would want to look at for 30 days at a time.
  • Look for photo quality. The better quality the shot, the better it will look on your wall.
  • It's not a popularity contest - so be honest with your choices. This calendar is for ALL chicken lovers!
So - with no further ado - I present your finalists:

Spring

1

2

3

4

5

6

7

8

9
***Vote for 3 Spring Favorites***

Please pick 3 for Spring
  
pollcode.com free polls 

Summer


1

2

3

4

5

6

7

8

9

10

***Vote for 3 Summer Favorites***


Please pick 3 for Summer
  
pollcode.com free polls 


Fall

 1

2

3

4

5

6

7

8

9


***Vote for 3 Fall Favorites***

Please pick 3 for Fall
  
pollcode.com free polls 

Winter

1

2

3

4

5

6


***Vote for 3 Winter Favorites***

Please pick 3 for Winter
  
pollcode.com free polls 

If you feel we have miscategorized any of the photos, please leave us a comment. It's not easy going through so many beautiful photos!

What Chicken Keeping Information Has Been the Most Helpful?

$
0
0
Voting on the photo finalists for our NCK 2014 Calendar is still open HERE. We will be ending the voting on Monday, November 18, 2013 at 6:00 PM Eastern Standard Time (US). 

In the mean time, we want to hear what natural chicken keeping tips have made a difference for you. We hope to include some of these tips in our calendar, so share what you think folks would be most interested in seeing. Tips can be seasonal wisdom, or brief overviews of the articles you have found most helpful. 

Please comment below with your favorite Natural Chicken Keeping thoughts. If you have trouble commenting here, send us an email at shabbychicken@hotmail.com.

We look forward to hearing from you!


*

The Natural Chicken Keeping 2014 Calendar is Now Available

$
0
0
Great news, everyone! The Natural Chicken Keeping 2014 Calendar is available to US customers... but don't worry - I'll be working on a calendar that should be available in Canada, the UK, Australia, and a number of other countries today. I will announce the international copy when it has been completed. And yes - that version will also be available in the US... but at a slightly higher price than this version. (Different sources.)

I have created two versions of the calendar. The standard version includes seasonal tips for chicken keepers. An example of the standard version (of course there are no watermarks on the calendar.


The "Minimalist" version does not include the tips - perfect for your non-chicken-keeping friends and family who will enjoy the beautiful photos.

 I plan to release both versions in the international calendar also, so stay tuned if you live outside the US.

 Click this photo to get your Calendar!

http://www.lulu.com/spotlight/NCK2014Cal2

*

ALL the NCK 2014 Calendars are now Available !

$
0
0
The calendars are done and there are a few to choose from!

For the slightly less expensive versions available only in the US, click HERE. These calendars measure 11" x 17" when open. (Available in one size only.) $14.99 USD

For a bigger variety, including a BIGGER calendar, and for international chicken-lovers, we offer:

The NCK 2014 Calendar with Seasonal Tips (11" x 17" when open) $24.30 USD

The NCK 2014 Calendar Minimalist Edition - bigger photos and no seasonal tips. (11" x 17" open) $24.30 USD

The LARGE size NCK 2014 Calendar Minimalist Edition - bigger photos and no seasonal tips. (14 1/4" x 22" open) $30.20 USD


Standard version with Seasonal Tips:


Minimalist Version without tips:


International folks - please let me know if you have any trouble. 

And for all those planning on purchasing a calendar or six - Enjoy!!

How to Help a Chicken with Frostbite

$
0
0


By Leigh -


You know? I didn't think it could happen to any chickens in my own flock. But it did, and it took my by surprise... suddenly I found myself with a chicken with frostbite. The tips of her comb were all blackened! How did this happen?

In general, frostbite affects chickens that live in poorly ventilated coops. Read more about this here: Winter Chickens – Mother Nature Versus the Coop. In short, moisture can't escape from a coop without good roof/ceiling vents and with nowhere else to go, the moisture condenses on the warm comb and wattles of your chickens. This moisture then freezes and causes frostbite...

But this particular chicken roosts in a very well ventilated hoop coop every night. How did she end up with frostbite?

I took her inside and used a warm, wet compress on her comb. Nothing fancy - just a paper towel soaked in warm (but not hot) water. Hot water on a frozen area can be very painful and can injure the tissue.

I was cautious not to rub the damaged tissue. Rubbing an area with frostbite can cause further tissue damage and invite infection. But even without rubbing, the wet paper towel came away with blood on it.

Upon further inspection under a bright light, it became evident that this pullet's comb had been cut during breeding. (I have a roo that likes to grab the girls by the comb when he mounts). Combs can bleed quite a bit. Apparently this poor pullet was still bleeding when she went to roost, and that blood froze over night when the temperatures dropped well below freezing.

After soaking the affected area, I slathered her comb with Nu-Stock ointment which has a base of pine tar. Because of the nature of frostbite, water-based or water-soluble cremes should not be used as they can freeze and make matters worse. Oil, wax or petroleum-based products will work best. I have also heard that extra-virgin coconut oil is wonderful for this kind of injury. Avoid mentholated oils or products with eucalyptus as they could potentially be very painful on frostbitten areas.


I waited until outside temperatures had risen above freezing before putting her back outside. Those who live in colder climates may not see temperatures over the freezing mark for days at a time, so wait until you are sure the chicken is on the mend and there are no wet or damp areas anywhere on the chicken prior to putting it outside again.

Unless it has a particularly severe case of frostbite, it is best to get the chicken back outside sooner rather than later - you don't want it becoming too accustom to warmer temperatures or you could end up with more problems when you do try to put it back outside a few days later.

Happily, by the next day her comb looked much, much better! I had been worried she would lose much of her comb because of the amount of discoloration I had initially seen, but it turns out the discoloration was mostly dried/frozen blood.


Frostbite Treatment Summary:
  • Use a warm (not hot) compress on the affected area, or soak lower extremities in a warm tub of water. Never use hot water.
  • Don't rub frostbitten tissue - it could cause further injury.
  • Inspect affected area(s) carefully and pat dry very gently or allow to air dry.
  • Slather frostbitten areas liberally with a natural oil-based ointment or salve. Those that have natural antibiotic properties (like Nu-Stock or pine tar) are very good choices as is organic, extra virgin coconut oil.
  • Be sure the chicken has no wet or damp areas before putting it back outside.
  • Badly frostbitten birds should be isolated and allowed to recover in a protected area until there are no open wounds present.
My dear friend (and NCK contributor) Justine lives in a far colder climate than I. Because of a well constructed coop, she has had almost no issues with frostbite... but she did have a lovely pullet by the name of Margaret that fell into the duck's water on a very, very cold day. Although Justine pulled her out of the water right away, the poor pullet's feet froze solid almost instantly. 

You can see Margaret's story here:


Justine shared a heart-wrenching article that will make you think twice about heating your coop or barn. I urge you to read it here:Fire Safety in your Chicken Coop & Barn 

Aside from poorly ventilated coops or random accidents like a bloody comb or an accidental mid-winter bath, frostbite should not be a big concern for most chicken keepers. Most chicken breeds are well suited to cold weather. They tend to nestle down over their feet when they sleep to keep them warm under their feathers and they tuck their heads under their wings to protect their comb and wattles. Tucking their heads under their wings serves another purpose too as it spreads the naturally occurring oils from their feathers onto their fleshy wattles and combs. These oils help to naturally protect the tissues and prevent frostbite. 

And if you are seeing frostbite in your flock, please check the amount of ventilation present in your coop!

Wishing everybody a happy and healthy Thanksgiving! 


- Leigh


(Please see the top, left sidebar for a quick link to our NCK 2014 Calendars!)


*

December Giveaway Eggstravaganza - Week One!

$
0
0

That's right folks - welcome to the first in the December Giveaway Eggstravaganza Series!

Did you know that the Natural Chicken Keeping Forum has a Canning and Cooking thread? That's just one of a number of really fun and interesting threads that don't happen to be chicken related. Our forum is 100% free to join, enjoy and share, so check it out!

And for those of us who happen to have empty Mason jars about, the Cuppow Drinkinig Lid for Wide Mouth Canning Jars is a wonderful thing to have around! (And not just for those of us who happen to live in the Moonshine capital of the world...) No - these are great for hot drinks (don't burn your hand on the jar), cold drinks, adult drinks or kid drinks. Check it out here.


So now, on to the fun!

Enter to win a Cuppow lid and 12 Mason Jars!


FOLLOW THESE THREE EASY STEPS TO WIN!

 1. Subscribe using one of the methods below to the Natural Chicken Keeping blog updates (Required)

OR
Follow with Google Friend Connect/Blogger - look for the links on the right sidebar that look like this:

You are free to unsubscribe at any time after this giveaway has ended. Natural Chicken Keeping will not share your email address with a third party. Your email address is solely used for the Natural Chicken Keeping blog updates and general updates from Natural Chicken Keeping. (If you're already a subscriber, just continue to step 2!)

2. Leave a comment on this post letting us know what you'll drink first with your Cuppow lid (http://amzn.to/15nbZLV).
 

3. Use the Rafflecopter widget below to confirm these entries and unlock more!

You can earn extra entries by following the instructions in the Rafflecopter widget.

 ### Be sure to visit this giveaway's co-hosting blogs!


### Note: If you cannot see the Rafflecopter widget below, click here to see the widget and enter now. 

A winner will be chosen via random.org. This giveaway ends at 11:59PM on Tuesday, December 3rd, 2013. The winner will be contacted by email, and will have 48 hours to contact shabbychicken@hotmail.com with his/her full name, address, and phone number. There is no purchase necessary to win. This giveaway is open to everyone!Best of luck!a Rafflecopter giveaway


*


Cheep -n- Easy DIY Chicken Boredom Buster Toy!

$
0
0


By Leigh -
 

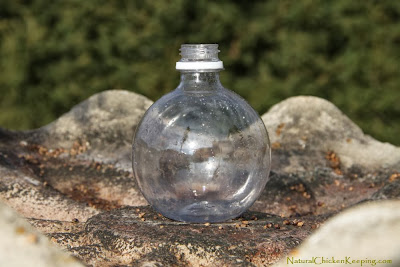
Yesterday when my family went to the grocery store, I spied a neat little seasonal special - popular soft drinks in little, round bottles that can be used as Christmas tree ornaments. And of course just like any other normal chicken obsessed wacko person, my first thought was, "Chicken Toy!"


This project is about as inexpensive as it gets and only takes a few minutes to create. This is the perfect boredom buster for penned chickens... though I have to say, my free-range flock has been playing with their toy for hours now!

Step 1: Empty the bottle and rinse thoroughly. You can actually make this kind of toy with any of the single-serving plastic soda bottles - I just thought this round one would be even more fun to use.


Step 2: Take the plastic outer wrap off of the bottle. The neat thing about these little seasonal bottles is that the outer wrap has a perforation which makes it very easy to remove.


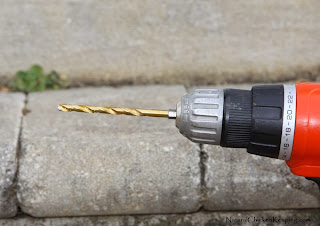
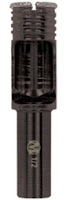
Step 3: Use a 1/4" drill bit to drill about 5-10 holes into the bottle. Before you submit your project to the 
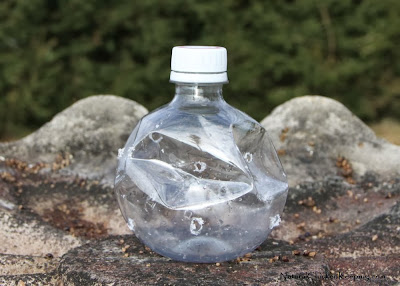
Nailed-It meme base, just know that only the coolest people will end up with a mashed monster of a project at this stage.

OK - so I'm not Martha Stewart...

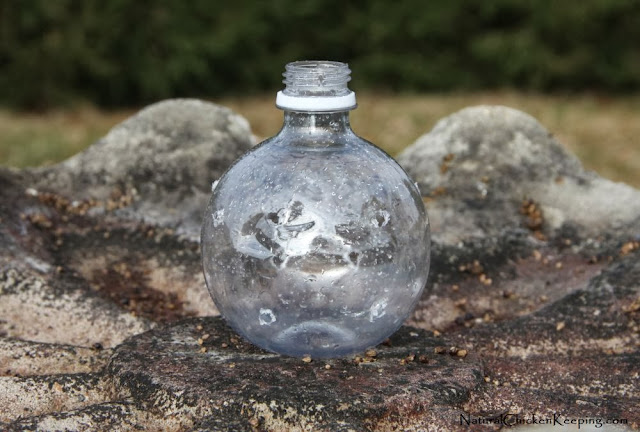
When your inner creative genius hands you squished lemons, find a stick and poke them into lemonade!


I found a stick with a part of a branch coming off the end which gave it a bit of an "L" shape. I inserted it into my squashed mess of a DIY project and got things straightened out a bit.


 It doesn't have to be perfect! After all, you are going to throw it into your chicken yard.

Step 4: Put some scratch and some dry feed into your chicken toy...


 And let the fun begin!


So - I spent $1.00 on a cute little round drink bottle and turned it into a toy that my chickens have not left alone since I put it outside about 7 hours ago (as of the writing of this article). That's not a bad return-on-investment if you ask me!

When one chicken looses interest, another comes right up and starts rolling it around until treats fall out. This toy is currently about 50 feet from where I originally set it down in the yard. The chickens can see the treats inside the bottle which keeps them trying to find a way to get those treats out.

So if you are worried about your flock not having enough to do, give this a try. I'm sure your chickens will love it as much as mine do.


- Leigh


And keep your eyes open - we'll be doing giveaways throughout the month of December! Be sure to enter - you could win some really great prizes!

*

December Giveaway Eggstravaganza - Grow Your Own Shiitake Mushrooms!

$
0
0

http://www.amazon.com/gp/product/B00BJ5F84S/ref=as_li_ss_tl?ie=UTF8&camp=1789&creative=390957&creativeASIN=B00BJ5F84S&linkCode=as2&tag=natuchickeep-20

I don't know about you, but I love Shiitake mushrooms! I stuff them, I saute them... I even use them like hamburger patties! No matter how I prepare them, my family goes nuts for them.

Now you have a chance to win your very own Shiitake Mushroom Mycelium Plug Spawn which allows the gardener to grow delicious, healthy shiitake mushrooms on logs or trees.

FOLLOW THESE TWO EASY STEPS TO ENTER!  

1. *Required - Subscribe using the form below to the Natural Chicken Keeping blog updates

Enter your email address:


Delivered by FeedBurner
You are free to unsubscribe at any time after this giveaway has ended. Natural Chicken Keeping will not share your email address with a third party. Your email address is solely used for the Natural Chicken Keeping blog updates and general updates from Natural Chicken Keeping. (If you're already a subscriber, just continue to step 2!) 

2. Leave a comment on this post letting us know your plans for your  Shiitake Mushroom Mycelium Plug Spawn.


3. Use the Rafflecopter widget below to confirm these entries and unlock more!

You can earn extra entries by following the instructions in the Rafflecopter widget.
 giveaway-feat 
Be sure to visit this giveaway's co-hosting blogs for extra ways to win! 


### Note: If you cannot see the Rafflecopter widget below, click here to see the widget and enter now.A winner will be chosen via random.org. This giveaway ends at 11:59PM on Thursday, December 5th, 2013. The winner will be contacted by email, and will have 48 hours to contact shabbychicken@hotmail.com with his/her full name, address, and phone number. There is no purchase necessary to win. This giveaway is open to US and Canadian residents!Best of luck!
a Rafflecopter giveaway

The Amazing Scavenger Hunt-n-Peck WINNERS

$
0
0
I would like to thank everybody for taking part in our Amazing Scavenger Hunt-n-Peck! 

And now for what you have all been waiting for -

Winners were chosen by Random.org...

And the winner of the signed copy of Lisa Steele's new book


is...

Sue S. (Leah's Mom)!


And the 2nd place winner of the Nu-Stock ointment (also chosen by Random.org)


Lindsey H.

A Big congratulations to both our winners!

Please email me your shipping information at shabbychicken@hotmail.com - I'll be shipping the prizes out after the first of the month.

Didn't win?? Never fear - we'll be doing a giveaway of Sarah Rosedahl's adorable book, Chicken Breeds A to Z very soon, so stay tuned!

And thank you once again for participating. We hope you had fun!!


DIY Glass Chicken & Poultry Waterer

$
0
0


The Glass Natural Chicken Keeping Waterer

By Sue -

I’m not a fan of plastic for a variety of health reasons, so I've been trying to come up with an all-glass waterer that is easy to fill, use, clean, and has a nice flat bottom so that it can sit on a water heating base in the winter if necessary. When fellow Natural Chicken Keeping Forum member MLOwenposted her plastic chicken waterer on the forum a "light bulb" went on for me, and I realized that I could make one from glass pretty easily.

So why don't I just use a glass bowl?

This waterer will be my
indoor, year-round waterer for the coop. In the summer I put Pyrex pans outside with water in various places so they can drink and stand in them if they want. But I always keep a main waterer in the hen house year-round.

For the year-round waterer, (whether used indoors or out) I don't want to have a large, open bowl getting dirt and shavings kicked into it. And because I live in a cold climate, I don't want any possibility of them stepping in the water in the winter and getting frost bite. I only want a small opening for them to drink from.

You might ask why I wouldn't just use my "vintage" glass waterers that work with an upside down canning jar since they are both glass and have a restricted area to drink from. 
 
I have several reasons:

1. They have to be turned upside down just like the plastic base, canning jar waterers that you can get everywhere.. I
hate having to turn waterers upside down. Additionally, the glass vintage kind doesn't allow the jar to be screwed in place so you have to pick up the base and jar together when you want to empty, clean and refill. I'd like to just be able to pick it up and set it down like normal without dumping water all over....and maybe wash out the dish part without having to dump out the whole waterer.

The Vintage Jar Waterer:

Zoom in (real dimensions: 960 x 720)

2. The base is not flat on the bottom so it doesn't make good contact with a heater base. It only has a relatively thin rim that it sits on. It was enough to keep the water open in the dish, but the water in the jar would begin to freeze from the top down.

See how the base has a rim (not a great photo)

Zoom in (real dimensions: 960 x 720)

3. I wanted to be able to make a waterer that would hold more than a quart if I wanted to.

So
why do they make them upside down anyway?
Because you have to have an air-tight seal or the water will just pour right out the bottom and spill everywhere.

So...on to:
The All-Glass Natural Chicken Keeping Glass Waterer

- I used a canning jar and a glass bowl (Anchor Glass). The canning jar shown here is 1/2 gallon capacity and I found the
perfect size glass bowl after some searching around.


-I set the jar into the bowl and made a mark on the glass at the height of the bowl top. The Hole needs to be drilled below the bowl height, of course, as the water depth in the bowl will rise to the top of the height of the hole.

- Purchased a a 1/2" glass and tile drill bit. (Tried using a smaller bit first, but found that 1/2" worked very well for water flow.)


- Then, very carefully drilled a hole at the right height. This is the tricky part as drilling glass can be a little unstable. I tried 2 different kinds of bits and liked the one shown best. I wore goggles, long sleeves and gloves just in case there was a shatter. I also practiced on a different jar the first time. Not one mishap!

I was very careful to wash out the jar and re-wash out the jar, as well as testing the edge of the drilled hole to be sure no glass shards or sharp edges were left to harm the chickens.


 -Now I needed an AIR TIGHT LID. Canning jar flat lids will make an air-tight seal when screwed down tight. (These are easily replaceable when needed...available everywhere!) I put one inside one of the plastic lids designed for canning jars to make the seal. However, you can use a regular metal ring rather than the plastic. I used the plastic ones because I happened to have one and because I know that the metal ones can rust and deteriorate and become hard to remove over time. The plastic and the flat lid will not come in contact with the water.

 
-When I fill the canning jar, I simply put my thumb flat over the hole. You could use a cork if desired, but the thumb method seems to work just fine. After it is filled, keeping the thumb over the hole, screw the flat down tight using either the plastic lid or metal ring. You can now either lay the canning jar down flat on its back with the hole up and remove your thumb from the hole as the water won't spill out, or just keep your thumb over the hole while carrying it out to put in the bowl.

-To put it in the bowl, put your thumb over the hole, put the jar over the bowl, remove thumb and set the jar into the bowl. It won't dump much water at that point so you have plenty of time to get it settled down into the bowl while holding the jar from the top.

-It will fill right up to the top of the hole level and stop. Refilling as the birds drink just to the level of the hole as long as the seal is screwed down tight to make it air tight.


-When I need to clean the bowl or refill the jar, I can lift it right up (upright) and tilt it back with the hole up. I have laid it on the floor on its back or on top of any other surface as the canning jars have "flat sides" and won't roll away. Pick up the bowl, dump and rinse out, replace the bowl and put the jar back in if not adding more water. Or rinse out the jar, re-fill as above, and replace onto the bowl.

http://naturalchickenkeeping.com/forum/memberlist.php?mode=viewprofile&u=153
                        (Picture is a clickable link to Sue's Forum profile. Joining is free!)

 
Much thanks to mlowen for the inspiration!


Note from Sue:
Regular followers have heard me talking about using glass forever on The Natural Chicken Keeping Forum- and about all the "evils" of plastic. I get especially concerned about the xenoestrogens in plastics and other manufactured products, siding on our houses, paints, pesticides in our foods and in the environment, etc. etc., etc.

There are so many people that are having estrogen-related issues due to overload in our modern times that I like to avoid plastics as much as possible. I surely don't want to add more estrogens to my food supply! (After all, healthy food is one of the main reasons I have the chickens!) See some links at the bottom of this post if you're interested in reading more about it.

Animal health and longevity are also at risk from these same factors...


A few Plastic/Estrogen related informational links:

-Here's a link with a quick list of items from which we get estrogens. http://endojourney.wordpress.com/2009/07/31/a-list-of-xenoestrogens/

- Article: The Terrible Truth About Plastics...http://articles.mercola.com/sites/articles/archive/2008/07/31/the-terrible-truth-about-plastic-you-never-knew.aspx

-Plastics Affecting Children's Health http://articles.mercola.com/sites/articles/archive/2011/06/10/now-they-want-you-to-microwave-your-toddlers-food-in-plastic-bowls.aspx

Much, much more out there on xenoestrogens and estrogens. Google "estrogens in the environment" for more info...how they effect cancer, development in boys, etc.

- Sue -

http://www.tillysnest.com/2013/10/down-home-blog-hopnumber-61-fall-cape.html?utm_source=feedburner&utm_medium=feed&utm_campaign=Feed%3A+TillysNest+%28Tilly%27s+Nest%29


From The Farm Blog Hop

*

How to Perform a Necropsy (Autopsy) on a Chicken

$
0
0


By Leigh


Warning! This post contains graphic content that some readers may find disturbing. Viewer discretion is advised.


But don't worry - the bird didn't feel a thing!


Losing a bird to illness or injury is not pleasant. Consequently, writing about the proper steps to take following the loss of a bird has not been the most pleasant thing on my "to-do" list either. Yet, as a person whose primary coping method for life's stressors is humor, perhaps I can provide an educational and informative "walk-through" of an unpleasant subject without too much unnecessary indigestion for all parties involved.

At very least, I will try...

You may feel that you aren't qualified or prepared to do a necropsy on one of your own chickens. I understand - I have been there too, but my own family can't afford to take a dead chicken 40 miles to the only avian vet in the area and pay more than $200 to find out that the bird died of "indeterminate causes," which is a vet's fancy way of saying, "I dunno."


A home necropsy can sometimes provide answers for free, as in cases of birds that died from parasite overload, heart failure, infection or from being egg bound. On the flip-side, finding signs of a respiratory disease (puss or fluid-filled lungs, signs of hemorrhage in the lung material, etc) would indicate that further lab testing is necessary to properly treat and prevent the loss of your entire flock.


*~*~*~*


So - as bad luck would have it, I had a Black Copper Marans pullet develop what seemed to be a respiratory issue on October 30th, only to pass away on the 31st despite my best efforts to save her. And that is how I unwittingly found myself with a knife in my hand and blood on my kitchen counters on Halloween.


But let's back up just a bit to the time when the bird first showed sings of illness - an innocent time when when I had not yet found myself taking part in any kind of unintentional dark Halloween ritual ill-timed necropsy.

Generally it is very easy to check the health and well-being of the vast majority of my flock, considering their desire to come right up and check the security of the knots in my shoelaces, peck at tasty-looking freckles on my calves (ouch) or even jump right onto my back while I am scooping out feed for them (because they respect me). In fact my Production Red hen, Penny, grows quite cross with me should I ignore her, and will peck my legs (hard) until I turn my attentions to praising the awesomeness that is her. If anything is amiss with my flock, I usually pick up on it right away. 


Unfortunately this Black Copper Marans pullet was one of my most standoffish birds. In fact, she was downright snobbish when it came to having anything to do with me at all. It is quite possible that her health issues started a day or so before I noticed, though I don't think that is the case as I always check everybody once they have roosted at night.

1. Identification of sick bird:

What I noticed first was that she had a listless, puffed up appearance. When I went toward her, instead of giving me her normal "look of death," she moved away halfheartedly. BIG RED Flag there! When I came closer I could see that she was having trouble breathing - she was breathing quickly, her beak was open and her body heaved with each breath. 

2. Isolation:

I isolated her right away. This is always the first thing that should be done if you suspect one of your birds is ill. Every time... no exceptions! Sure - it could be something simple like a reaction to dust after an excetionally luxurious dust bath, but it could also be something that could wipe out your entire flock, so don't take chances. The further away from the rest of the flock you can get the ill bird, the better!

3. Checkup/Treatment

Once separated, I took my time and checked her very thoroughly. Her eyes and nose were clear - no signs of discharge. Generally if a bird has a respiratory illness, the eyes will appear drippy or foamy and there will be discharge from the nose. Often a crackling sound can be heard when they breathe from an accumulation of mucus in the airway (you know - like your friend's uncle who smokes 6 packs a day...) 

None of those symptoms were present in this bird. That led me to think perhaps she had gapeworm... gapeworm is a parasite carried by earthworms that, once the host worm is consumed, will happily take up residence in the trachea area in a the early bird's throat. (Yup - so now you can tell your friends that the early bird is more likely to get gapeworm than the fashionably late bird.) Eventually it can cut off their airway and cause asphyxiation. 

I did what I could for this bird as naturally as possible, and because her particular symptoms were so advanced I used some medical/chemical means also as a last-ditch effort. (*I generally practice all-natural prevention and rarely need to use anything "unnatural" in the care of my birds... but when a bird is in dire distress I am not opposed to resorting to less natural options in a life/death situation.)

Unfortunately the symptoms were no better the next day, and when I took her out of the isolation cage to treat her with some soothing herbal steam, she died even before I started the treatment.


What to look for if the bird is still alive:
  • Signs of discharge from eyes, nostrils and/or beak
  • Diarrhea, green watery feces, white feces (mostly urate) or lack of feces/urate
  • Cuts or abrasions
  • Heat or swelling (is bird using both legs/holding both wings properly?)
  • Difficulty breathing
  • Straining (egg bound) or broken egg discharging from vent
  • Pale comb (anemia - usually from parasites or blood loss)
  • Blackening comb at tips (frostbite/hypothermia)
  • Purple darkening of comb - not enough oxygen/asphyxia/heart failure
  • Sunken eyes
  • External parasites (mites/lice)
  • Legs color changes or poor scale health (check feet for bumblefoot)
  • Odd neck posture - star gazing (vitamin deficiency)
Take note of anything and everything about the bird that strikes you as being off. This can help you determine the proper treatment... or cause of death if your bird passes.

4. Postmortem External Exam

If the bird has passed, take your time and look over the entire bird for outward signs of what caused the death using the same basic list as above. 

 (Checking the beak and throat for signs of respiratory illness or gapeworm. No gapeworm was present in this bird.)

You do not need anything fancy to perform a basic necropsy.

What you need:
  • A flat surface to work
  • A sharp knife
  • Poultry shears
  • Light
  • Paper towels
  • Water to rinse your hands
  • A waste container or garbage pail

You don't need to worry about having sterile equipment. Let's face it - at this point your bird isn't going to develop an infection from a few germs.

A necropsy is rather different from processing a bird for food in that you don't want to damage any of the internal structure until you have had time to look them over. Because of that, you need to cut the chest open to expose the organs.

You may find it helpful to give the body feathers  a bit of a "trim" around the area you will be cutting to allow you better visibility (and fewer feathers in the body cavity). Scissors work fine - but be prepared for some floating feathers! 

Use good poultry shears or a sharp knife (very carefully) to cut on one side of the sternum (keel) bone. It really doesn't matter which side.


For teaching purposes, I skinned the bird in order to take better photographs. The feathers were getting everywhere and sticking to everything... not conducive to a "clean" photograph of the inside of the bird.


In these two photos you can see the two distinct tubes - the trachea or windpipe and the esophagus which takes food down to the crop.


The trachea and esophagus follow the spine down the neck and then branch off as one goes to the lungs and the other to the crop. Here you can see the heart... and hmmm... there just might be something amiss with the heart (aside from the fact that in this picture it looks like an angry squid playing an organ... an organ? Unexpectedly punny!)           Note the deep (un-oxygenated) color of the blood in the atriums. In a healthy heart you generally won't see this kind of color difference. Google image search results.


And another view:


If you are performing a necropsy, pay attention to the color, shape and size of each organ as well as yellow fat deposits. This particular pullet does not have much fat on her, but fat deposits and around the organs can kill heavier birds.


This bird's crop is full, and there is nothing notably wrong with her digestive system. 

One thing I did note was fluid in the body cavity around the heart. This is often indicative of heart failure.


In the above picture you can see some red veining on the intestines. This is a sign of a cocci overgrowth. If this bird had actually died from coccidiosis, the intestines would likely have had a much more swollen appearance. 


When birds are having health issues, it is very common for them to develop an overgrowth of cocci as a secondary problem due to the body being in distress and a lowered immune system.

After fully assessing the digestive tract, I removed it from the bird to access the lungs. (Don't I sound official?) Though at this point I was fairly certain the heart was the culprit in this bird's death, I needed to be able to rule out a respiratory illness as such illnesses can be devastating to a flock.


The good news is that the lungs have a healthy appearance (aside from the fact that they are not actually working nor are they inside the bird). 

So - the checklist (in no particular order):
  • Check crop - is it empty or full?
  • Open and check gizzard - there should be plenty of grit inside.
  • Liver should be deep maroon in color and smooth. There should not be marks or fat present.
  • Intestines should be smooth and pink-gray in color (Silkies may have darker flesh and organs).
  • Once digestive system has been checked, remove from carcass in order to access lungs, kidneys and reproductive organs.
  • Check trachea for signs of mucous or fluid indicating respiratory illness.
  • Heart should be fairly uniform in color and should not have swelling or fat present.
  • Lungs should be uniform in color and should not have signs of hemorrhages, puss or fluid.

Crop, gizzard and intestines have been opened to allow for the inspection of contents.


Although my flock does get pumpkin, cucumber and squash seeds regularly to help control internal parasites, this bird was near the bottom of the pecking order and likely did not get her fair share of these goodies. She did have a small number of roundworms in her intestine. While I'm not thrilled about the discovery, I can also say that it was not the kind of infestation that would kill a chicken. 


In light of this discovery, I will likely be feeding pumpkin seeds to each chicken individually in the next week to ensure all birds get full advantage of the anti-parasitic properties of the seeds. 


Eww. 

This bird was not yet laying and therefore her reproductive system was not fully developed. If you are performing a necropsy on a mature hen, be sure to take a good look at her ovary and oviduct.

It should be fairly obvious if death was caused by egg binding or complications from a broken egg internally. Eggs can break while still inside the hen and the sharp shell can cut into her oviduct. This may allow infection to start inside the bird and can ultimately be fatal.

In the case of this pullet, I believe it is fair to deduce that the respiratory issues were a result of a failing heart. The heart was unable to properly pump the oxygenated blood through the body resulting in the bird gasping in an attempt to get enough oxygen to function. 

Because the lungs and trachea were clear, I feel satisfied that there was not an actual respiratory illness present. This makes me feel much better, knowing that a dread fatal virus is not sweeping through my flock. Interestingly, I lost this bird's brother (from the same breeder and same hatch) to heart failure a few months ago. My guess is there may be a genetic issue here.

I hope this brief instructional on the "DIY necropsy" has been helpful. The first time trying something like this is always the scariest, but remember... 
...you're not going to kill the bird by trying! 

If you do find signs of a possible communicable disease or virus, please be sure to seek further assistance from your county agricultural extension, an avian vet or your state laboratory. Testing and proper treatment may help save the rest of your flock.

- And of course while I hope you don't lose birds to illness, even the best, most attentive chicken keepers do lose birds occasionally.


Angry organist squid was apparently playing a failing organ. No wonder he was angry!


- Leigh

*

December Giveaway Eggstravaganza - Essential Oils!

$
0
0

You guessed it! It's time for another giveaway! 

FOLLOW THESE TWO EASY STEPS TO ENTER!


Read more »

Hatching in an Ice Storm

$
0
0


By Leigh


   Yes - we're having quite the little ice storm here in Southern Virginia.

Read more »

The Chicken Swap Meet

$
0
0
By Leigh -

A chicken swap is basically a gathering of people at a predetermined location for the purpose of buying, selling and trading poultry, small farm animals, crafts and farm supplies. Many Tractor Supply Company stores around the US host chicken swaps regularly, and many other feed and farm supply stores might be interested in hosting swaps if you will set it up and spread the word.

Many monthly swaps are smaller with 10 - 20 sellers and any number of buyers. Of course size will also depend on how well the word has gotten out, the weather forecast and how many chicken enthusiasts are in the area. Often you can find out about area swaps on popular chicken forums or at your local feed stores.

Here in Virginia we have monthly local chicken swaps, but twice a year hundreds flock to Gilman's Farm & Feed Store in Glen Allen, VA (just outside of Richmond).  


And what can one find at the Gilmanor swap?

 Guinea pigs & rabbits.

 Older farmers shopping for homemade canned items while kissing baby goats wrapped in blankets.

 Thanksgiving dinner.

 Delicious snacks.

 Interesting breeds of pigeons masquerading as decorative Asian fans.

 Bird toys.

 Brilliant pheasants.

 Bloggers.

 Chickens sticking their heads out of the tops of boxes.

  Chickens sticking their heads out of the sides of boxes.

 Peafowl.

 Waterfowl.

 Things that aren't chickens.

Well-organized sellers that must go to A LOT of swaps!

 Homing pigeons.

 Fuzzy, four-legged flock-watchers.

 Laying pullets that have been debeaked. 

And pretty much anything else one can imagine. I even saw somebody selling mixed-breed foxes.

I carpooled with my friend Karen. We got a chance to meet up with a number of old friends and wonderful people we met online, which made the day even better.

So - if you want to go sell at a chicken swap, what do you need to know and bring?
  • First, find out where and when chicken swaps are held in your area.
  • Find appropriate cages to keep your birds in while there. (Wire cages work well as people can see your birds easily without touching them.)
  • Be sure to bring food, water and a source of shade for your critters (and for yourself, too.)
  • Bowls for the food/water.
  • Bring money to make change for buyers.
  • Do NOT bring sick birds!
  • Extra cages so that you can keep any birds you purchase separated from your other birds. (New birds need to be quaranteined for at least 2 weeks prior to being added to your existing flock - unless it is a chick that has not been out of the brooder yet.)
  • A source of heat for any young chicks you bring. (I brought broody hens to keep my chicks warm.)
  • The "menu." This can be a large print out of what you have for sale with the prices, a whiteboard & marker, a bulletin board or any other means of listing your birds/prices. 
  • Hand sanitizer
  • Paper towels
  • A large fish net with a long handle to catch escaped birds.
  • Business cards (if you have them).
Chicken swaps are a great way to make a little money from your hobby, meet new people and add new birds to your own flock.

Just remember, the birds other people bring may not be as healthy as yours, so do not allow anybody to touch your birds unless they are buying them. Have them use hand sanitizer prior to handling your birds. Use caution when shopping for birds at a swap and if you are planning on buying new birds, have a quarantine area ready at home.

Lastly, have fun! If your spouse, friends and family roll their eyes when you start talking chicken, swaps are a great place to meet people who speak your language and appreciate your flock anecdotes. 

- Leigh  

If you live in or around Virginia, the Gilmanor Swap is held the  1st Saturday in May and the 3rd Saturday in September. Vendor spots are only $10.00 (subject to change at the discretion of the management). The address is:

Gilman's Farm & Feed
12187 Chewning Rd.
Glen Allen, VA 23059

*
Viewing all 182 articles
Browse latest View live


Latest Images